
Airplanes in the United States, with some exceptions, broadcast their position, call sign, and some limited telemetry using a technology called Automatic Dependent Surveillance - Broadcast, otherwise known as ADS-B. It’s an open, unencrypted standard, so can be easily read by anyone with an interest in tracking airplanes.
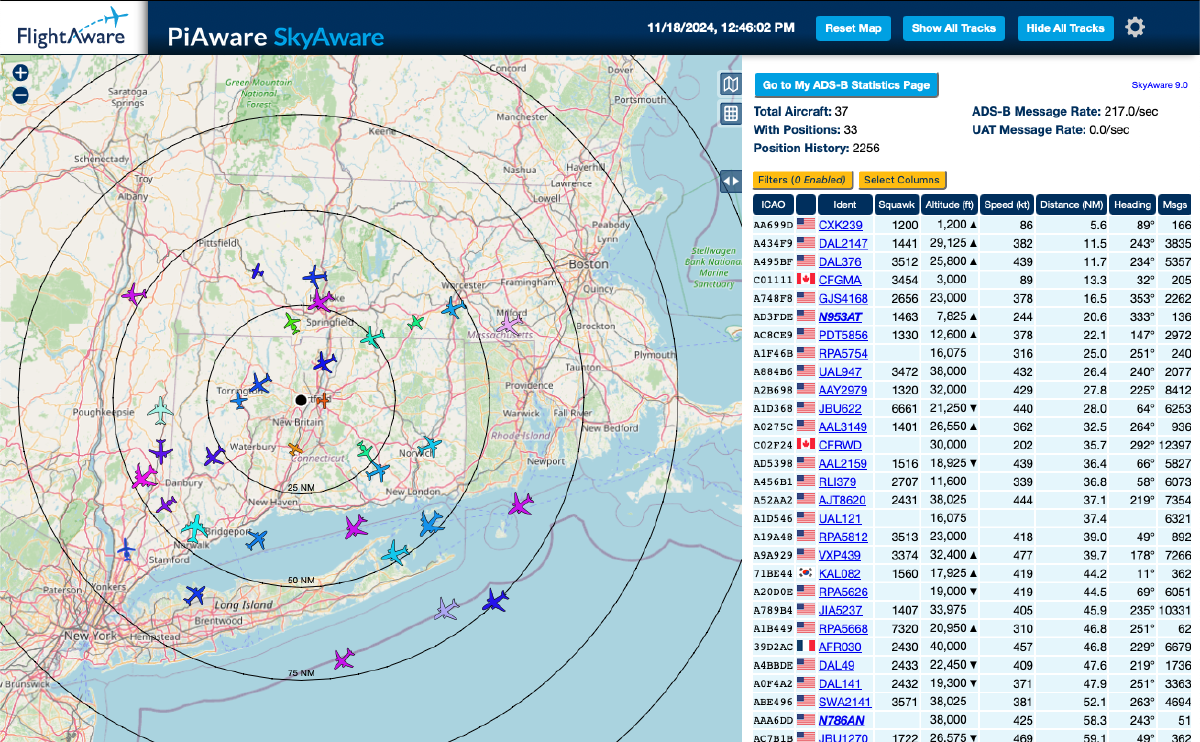
Now, I’m a nerd, and I get interested in random things like this for the heck of it. I was already working on a radio-based project, so was already solving the outdoor mounting and antenna problems. I also love air travel. If you’ve ever looked at a map of all the airplanes currently in the air, it’s awe-inspiring. Beyond that, running a station and sharing the data with FlightAware gets you a free enterprise FlightAware account - more info on individual airplanes/tail numbers, stats, and more real-time data.
There are two ways you can go to build this out. First, FlightAware sells a packaged solution called FlightFeeder, you just provide an antenna and mount everything up. The second option is to grab a Raspberry Pi and install PiAware on it. From the title, you can guess which one I went with.
While FlightAware has a packaged Raspberry Pi image for PiAware, I opted to use a plain old installation based on Raspberry Pi OS. My node is based on a Raspberry Pi 5, has an SSD mounted - it’s overkill for this use case. I expect I will make this node do other things over time. I wanted an image I felt comfortable fully customizing.
This was a lot of fun to put together. It’s a very simple project with loads of possibilities to go beyond the basics. The parts list is small, and the software very easy to install.
Parts #
Here’s the part list for the node itself, and the antenna that goes with this project. To get this outdoors, I’ll refer you to my writeup about my Meshtastic node. This project is in the same enclosure as that project.
Project Specific Parts: #
Here’s what you need for the basic PiAware setup.
- Raspberry Pi 5 - I use an 8GB Pi, it’s overkill. 2-16GB boards are now available - (amazon, digikey). It was nice having a full-sized Pi with multiple USB ports.
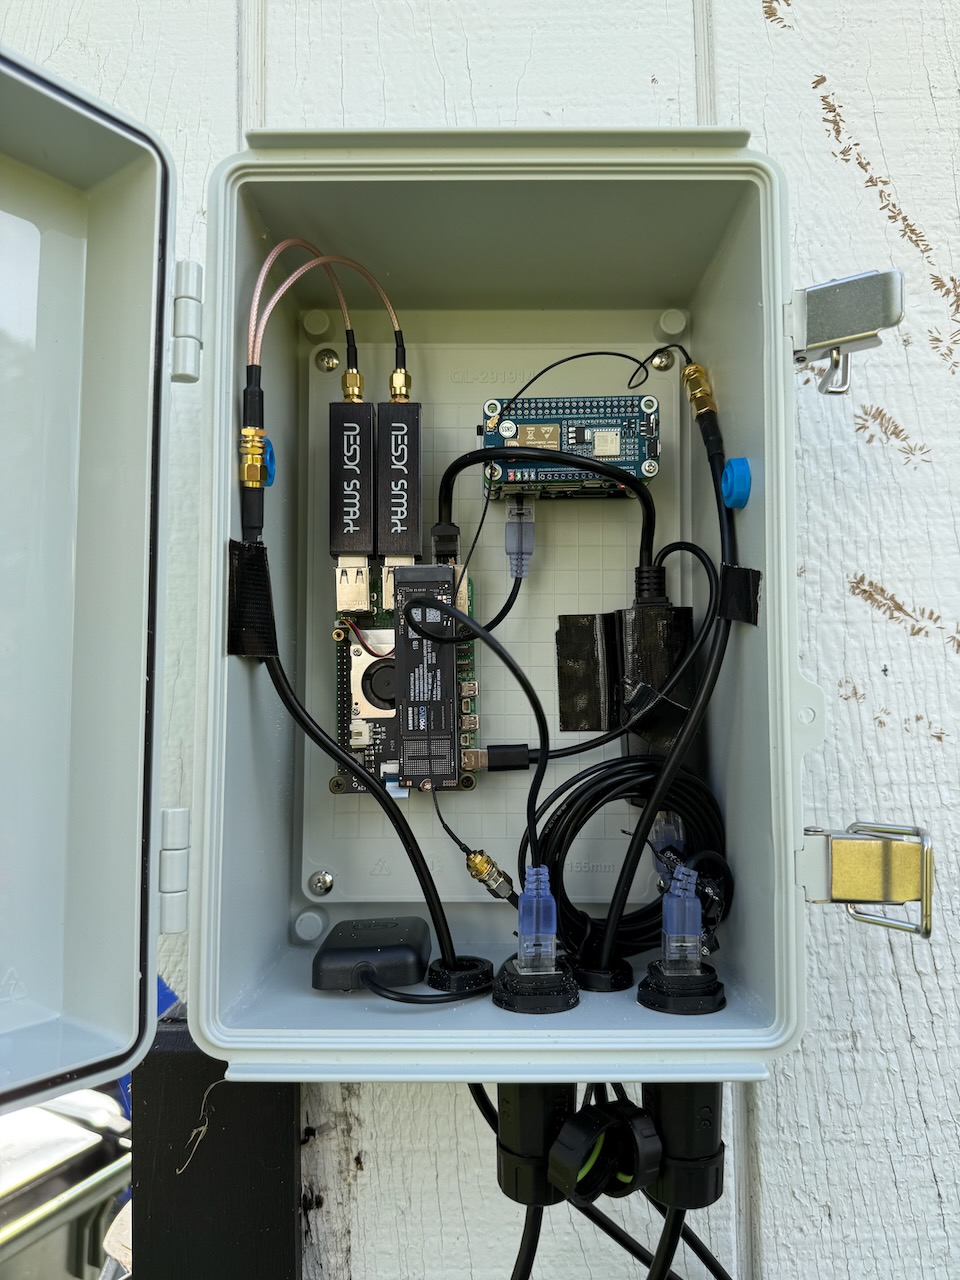
- Nooelec RTL-SDR v5 SDR (amazon) - These allow the Pi to receive radio signals. Through software, the radio can be tuned to different frequencies. These are nice, have an aluminum heat sink, and fit nicely side-by-side. We need two in order to receive both types of transponders out there.
- 1090MHz 978MHz Dual Band ADS-B Antenna (amazon): Antennas have specific features to improve reception at certain frequencies and use cases, so make sure you grab on that supports ADS-B bands. sure you get one that is meant for airplane transponders (will say ADS-B and UAT). This includes an N-Type to SMA cable. If your choice doesn’t, please make sure you get a cable. Something like this on Amazon should work.
- SMA Female to Dual SMA Male Splitter (amazon) - the lead from your antenna will need to be split to connect to both radios. If your cable ends in an SMA connector, this splitter should work. Match your connectors so there aren’t any surprises.
If you look at the photo below, though, you’ll notice that I added some other parts. Let’s take them by category.
Storage: #
I prefer using SSDs over Micro-SD cards. As I noted above, this is completely unecessary. A good Micro-SD card will work perfectly fine! This project does NOT write much to the local disk.
- PCI-e to NVME Hat for Raspberry Pi 5 - I used this Geekworm HAT for this build which mounts on top of the Pi like a normal HAT. I do prefer the NVME bases from Pimoroni these days, though. You can get them on Amazon.
- Samsung EVO 990 1TB SSD (amazon) - Again, overkill - I use a Samsung EVO 990 for most of my Raspberry Pi builds. Seems to work well with most of the PCIE SSD boards out there.
If you decide to go with a MicroSD card, any Class 10 card aimed at security cameras should do fine. These are usually meant to handle heavy disk activity, will be less likely to fail. My favorites have been Samsung Pro Endurance MicroSD cards.
Power: #
To power the project, a lot depends on your mounting location and plans. If you follow how I’ve mounted these outdoor projects, I’ve leaned on POE to allow flexibility in mounting locations and the ability to use long runs without sending AC voltage down those wires.
If you decide to just power it with USB, you can grab any USB-C power supply. It’s also handy to have one around for initial setup. If you don’t have one, I trust the Canakit power supplies (amazon). Odds are you probably have a random USB-C power brick lying around. Just make sure it can do USB-C PD with at least 27W at 5volts. Not all of them do, and sometimes it’s not always broken out on the fine print on the charger.
For POE, just keep in mind that the radios take a lot of power. I had to replace my initial POE splitter with
one that had a higher power supply, since this Pi couldn’t use a POE Hat (my SSD was mounted on a traditional HAT).
With a random POE splitter, the Pi would occassionally stop responding. Diagnosing the issue, I found
under-voltage messages in the dmesg logs, so I moved to a POE splitter with a higher power output. I ended up
with an “industrial” one (amazon) that had 5A output at 5V. Seems to have stabilized
Pi.
Software Setup #
I use ansible to setup the Pi and configure everything. Here is the role for setting up PiAware. This basically captures the instructions on the PiAware site.
-   block:

    -   name: Check if piaware is installed already
        command: dpkg-query -l piaware
        register: deb_check
        ignore_errors: true

    -   name: Configure and install piaware
        become: true
        ansible.builtin.shell: |
          wget <https://www.flightaware.com/adsb/piaware/files/packages/pool/piaware/f/flightaware-apt-repository/flightaware-apt-repository_1.2_all.deb>
          sudo dpkg -i flightaware-apt-repository_1.2_all.deb
          sudo apt-get update
          sudo apt-get install -y piaware
          sudo piaware-config allow-auto-updates yes
          sudo piaware-config allow-manual-updates yes
        args:
          chdir: "/tmp"
        when: deb_check.rc != 0
        register: piaware_install

    -   name: install dump1090-fa
        ansible.builtin.apt:
          name: dump1090-fa
          state: present
        register: dump1090_fa

    -   name: install dump978-fa
        ansible.builtin.apt:
          name: dump978-fa
          state: present
        register: dump978_fa

    -   name: install piaware-web
        ansible.builtin.apt:
          name: piaware-web
          state: present
        register: piaware_web

    -   name: install rtl-sdr
        ansible.builtin.apt:
          name: rtl-sdr
          state: present

    -   name: Reboot if required
        become: true
        reboot:
        when: piaware_install.changed == true or dump1090_fa.changed == true or dump978_fa.changed == true or piaware_web.changed == true

    become: true
That’s basically it. Find a safe way to get the antenna outside, routed to the Pi. As you can see below, I mounted the whole thing outdoors. Details on the outdoor mount can be found on my Meshtastic project post.